Thursday, November 15, 2018

New at the Studio. Savage MultiFlex Light Stand. Part 1

We were looking forward to the arrival of this light stand here at the photo studio even though we have a number of Savage Universal stands in the studio including the Drop stand which we featured a while back (you can check it out here  New at Studio Savage Drop stand ).
So you may notice the key word "studio" mentioned a couple of times already . For the most part our arsenal of lighting stands are pretty much "studio equipment",  we have used the Drop stand and other models out on location but the new Multiflex stand has quite a few nice features which makes location shoots easier so this will be our first two part blog feature. We'll go over the key features which make this stand the "all-terrain" go to stand for us as well as our new indoor location stand. So for part one we're headed out of the studio for show & tell.
Let's start with some specs :)

Savage sent the 6' extending version ,  it also comes in a 10' model.

The 6' model extends to 75" tall and collapses to 26".
Holds up to 9lbs  extended.
It weighs 5.5lbs.

The 10' version extends to 125" tall and collapses to 39.5" in height.
Max load at 8lbs when extended and weighs in at 6.5lbs.

The 6' MultiFlex with Nikon SB910,  Expoimaging Rogue grid. PocketWizard PLUSIII transceiver

Starting at the top the center post has a classic feature which we only find on a few light stands and its one of our favorites. The steel stud/spigot is removable and is double sided (1/4"-20 thread and 3/8") with a top vertical position or a side horizontal hole. This comes in really handy for a lot of macro photography lighting scenarios.


The center sections 
are also air cushioned to help prevent lighting
 from accidentally slamming down when
 tensioners are loosened.


The big feature are the legs, two of the adjustable legs work in unison while the third slides independently giving the stand the versatility for slopes, stairs, uneven ground and can even be slid under objects or against walls for confined spaces.

"What stands on stairs , alone or in pairs?"


All of the legs are telescoping with flip locks for fine tuning the stance, a bubble level is attached for really getting things balanced out and all the legs have rubber feet that keeps stand from sliding around.

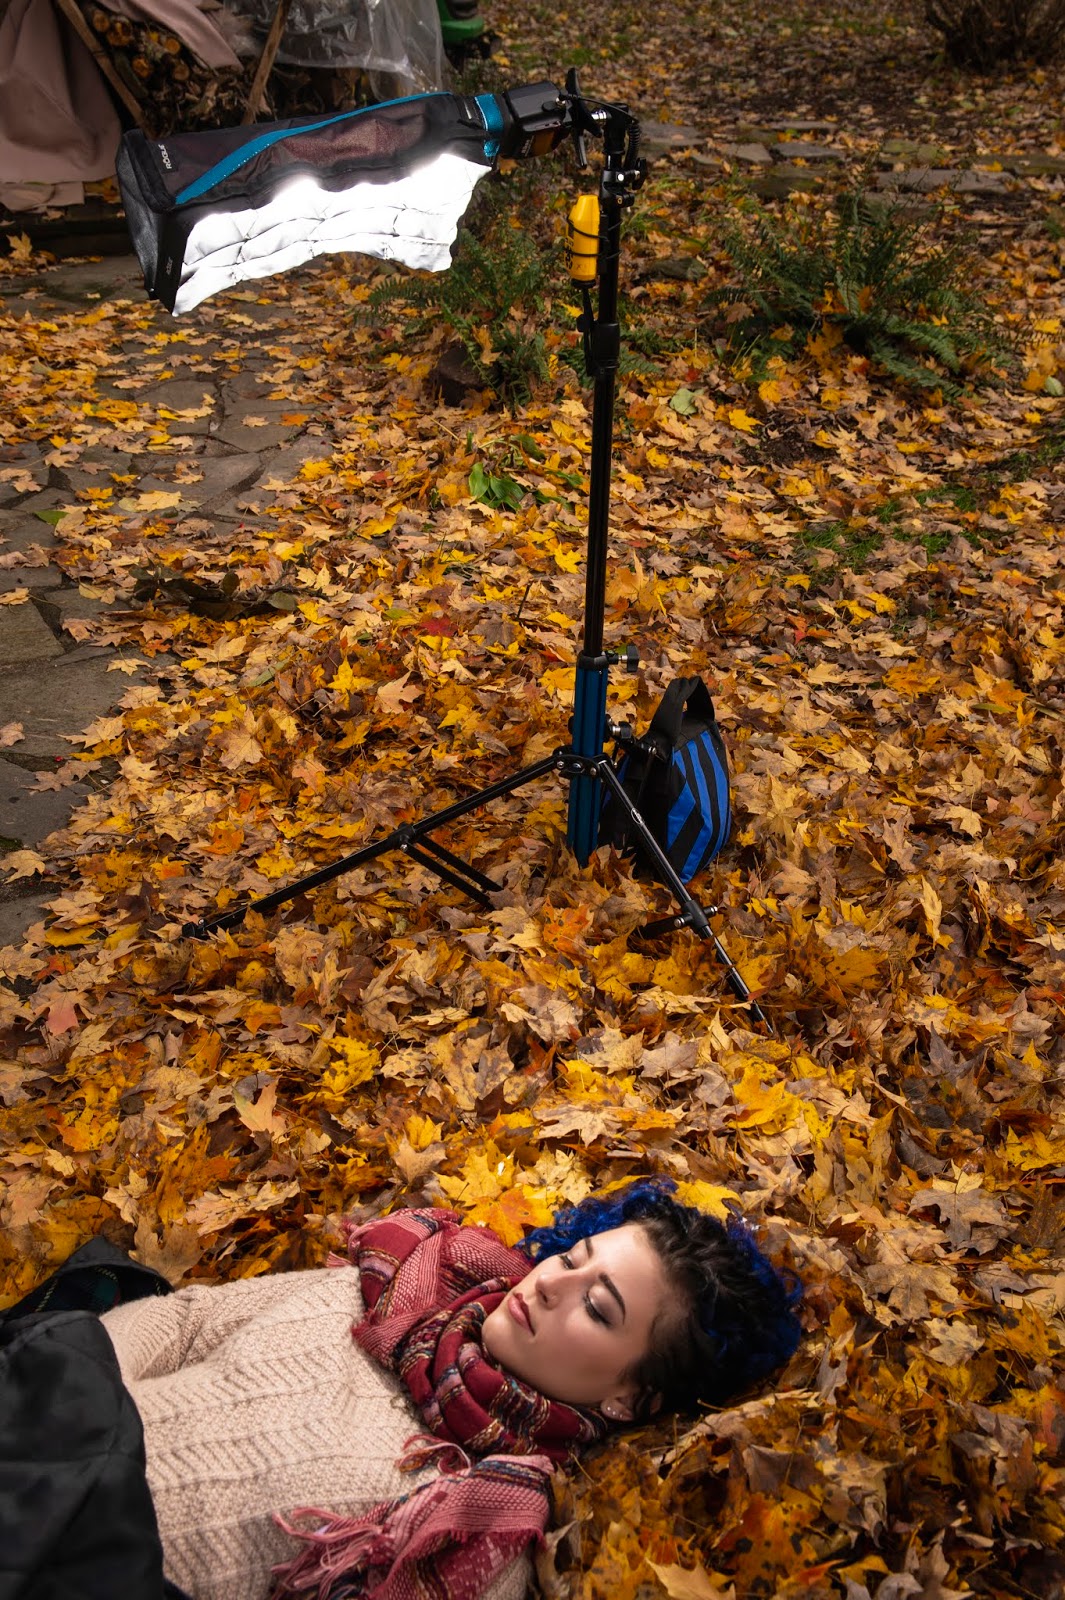
For the first trial we wanted to keep the lighting equipment light and simple with the speed light and another Rogue light bender. In the coming week we'll post about our studio set up with some heavier gear, speaking of heavy I decided to push on the stand to test the leg locking strength and discovered a minor issue that I informed my contact at Savage about. The  bottom leg sections were a bit slippery due to some oil residue,  this was easily corrected by spraying some window cleaner on the sections and wiping them down. I'm guessing it was some residue from the machining process.

Back to the first trial, we booked singer songwriter SØF , she's modeled for us a few times and always does a fantastic job. Cold blustery day for the shoot so going to apologize to her again and a big thanks for putting up with me and the weather :)

As you can see we switched the from the Rogue grid to the Rogue Flashbender 2 XL Pro

Warm blanket is a must, those leaves were cold and wet! What a trooper!

Still smiling...and hopefully not planning revenge

The stud moved to the side position. For safety we added a sandbag to the stand anyway, though it was pretty rock steady it was very windy and we don't take any chances with equipment that close to the model

Finally off the ground! The stud switched to the vertical position. We did take the sand bag off for this session, the stand was nice and level on the slope


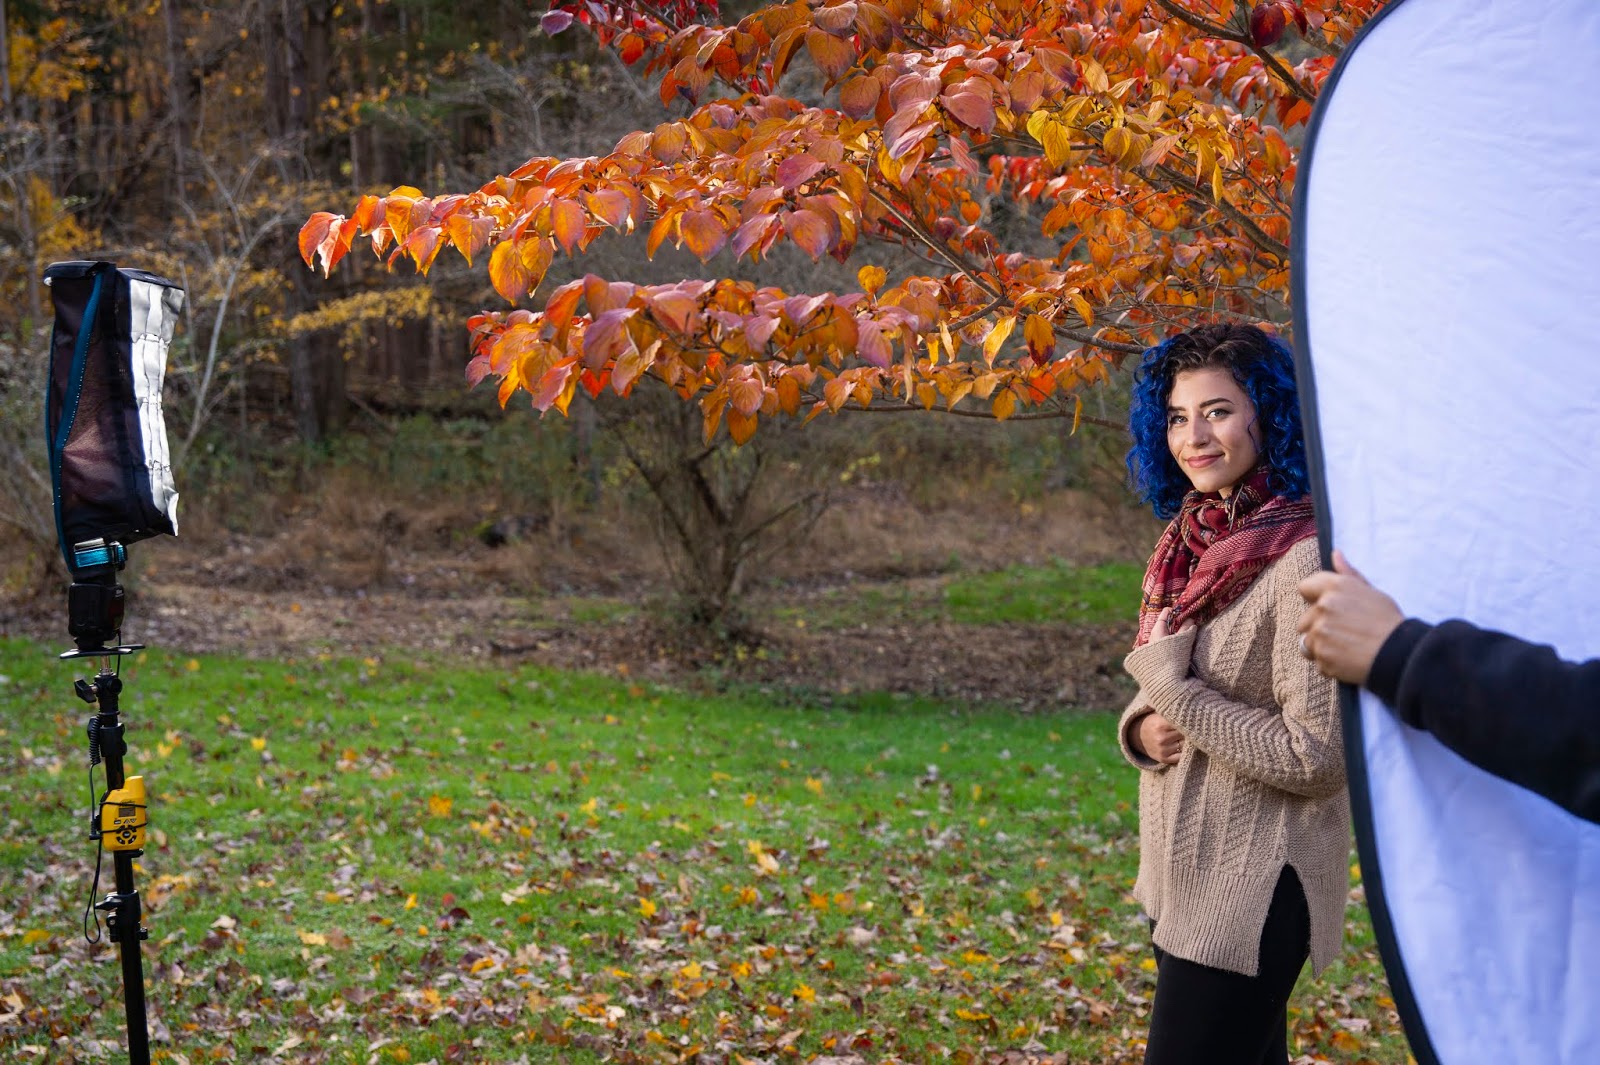
Waiting for the sun to hit the tree
So moving from sessions the stand did a really good job in the low positions with a nice wide stance and moving to the slope it was no issue getting it level on the hill. Good part of adjustments can be made with one hand while some fine tuning was done with two. It does come with a removable strap and a cable guide 
/tool holder clipped to it and it all can be stowed in the travel bag it comes with. A little heavier than some of my studio stands but it makes up for that with stability and versatility! It's pretty snazzy looking as well, bit of a sci-fi look to it :)

Going to wrap up this chapter, we'll follow up with part 2 in the nice warm studio.
For more information check out this light stand and other equipment used on the Savage website.


Also some of the other brands/products contact,


Tuesday, April 17, 2018

New at the studio. Savage Ultramarine seamless & 5-in-1 Port-a-scrim

Going to start off by apologizing, last few months have been pretty hectic in and around the studio. Just around Christmas I developed pneumonia which lasted for about a month, maybe a little bit more. Plagued by some car and truck issues and some studio repairs everything just seemed to stack on top of each other for a while. Setting this aside we’re posting a “new at the studio" blog installment. (better late than never, right?)
 Our incredibly patient Sponsor Savage Universal corporation was kind enough to send us some new gear to try out here in the studio. Once we got the news they were shipping the products we started to put together a plan featuring model Kelly McCarthy and make up artist Gianna Joy Bass
 Savage sent the #5 ultramarine seamless background. We’ve been itching to try out the color, incredibly versatile and mood setting tone.


 Savage also sent their Freestanding 5-in-1 Port-a-Scrim,  (large 55“ x 79“) version. It's comes with your standard 5 in 1 set-up with white, gold, silver, black and diffuser. A lightweight aluminum collapsible frame makes easy to manage.
  It comes with a stand to position it in a number angles and orientations. A handle is also included that attaches to the stand if you want to have an assistant hold it up and over a model to diffuse or block sunlight outside the studio...for this I've always referred to scrims as "model swatters" as it looks like the assistant is holding a giant fly swatter over the model...."didn't nail the pose?... give em' the swatter!" Kidding!

 We’ve been trying to hunt down a great large scrim for quite a while. Not only are they versatile for the studio but for outdoor shooting they're almost a necessity.
With the ultramarine color and consulting with M.U.A Gianna for the makeup color and Kelly about the clothing we decided to keep the shoot sleek and stylish for a strong fashion look in a dramatic mood. Kelly has no problem pulling that off.


 We did a two light set up at first as we had a lot of reflective coverage happening with the scrim. We implemented our Bowens Gemini series monolights triggered by the new Pocketwizard PlusIV transceivers. Moving on to a more "flowy" feel we added an additional light and had Kelly switch to a looser fitting outfit.


Though the session was pre- visualized through some planning we still did use the elixxier set a light 3-D software to have better lay out the lighting and floor plan before the shoot.
The shoot came off without a hitch, the seamless background color just gave an instant mood to the shots. Kelly matched her posing and expression to the tone of the shoot, Gianna did a great job with the make up, she really set the tone and attitude with some stunning eye makeup. She really transformed Kelly.

 The moody #5 Ultramarine seamless background is one of my favorite colors in the studio at the moment and I'm really looking forward to trying it out with some different lighting scenarios.
As far as the model swatter...um, scrim I could not be happier. Warmer weather around the corner I can't wait to use it to it's full potential outside the studio or on location!

Some of the other gear used.
Nikon D4
Sigma lenses, 24/70mm f/2.8 and 70-200mm F/2.8
3 Legged Thing Frank Tripod


Kelly McCarthy (model) Gianna Joy Bass (MUA & Hair)
 Well I hope to update the blog more often, lot of things happening here and the business is headed into a few new directions so I hope you stay tuned
.
Rob Lopshire

Tuesday, February 9, 2016

New at the Studio: Savage Drop Stand® Easy Set Light Stand

For our second installment of "New at the Studio" we're featuring a new light stand by our sponsor Savage Universal, Savage sent the Drop Stand® Easy Set Light Stands to our studio last week for us to try out. When our contact notified me of the new stand I really did not know what to think, I've heard of quick stands but never heard anything good about them, I also did not think I would ever use one as it seemed the few on the market were on the low quality end with flimsy construction and the only high end ones I found were similar to what was used by a friend of mine who is an electrician, they were expensive and no way to convert in for photographic attachments.

Happy to say the stands Savage sent me fit the bill, a good quality, well built sturdy stand with the feature I never thought I would use. Once I made a quick adjustment to the "collar limiter" I was picking up and dropping the stand with ease all over the studio. the stand is incredibly handy for a number of situations, the main situation being those days I may not have an assistant for the day.
   I never liked asking a client or model if they could "give me a hand" (though most are willing to lend a hand). Some photo shoots call for a change of scene or even just a changing of the light set-up, this proved to be pretty easy task with the Drop Stand even with gear or camera in my other hand. This may not sound like a big deal to some of you but moving a light stand in a locked position makes for a hazardous tripping situation if you don't fold the legs away before moving it.
  I found it worked very well on most hard surfaces in and around the studio, other indoor surfaces such as deep carpeting you may need to place the legs manually after placing it...same with a few outdoor surfaces but the legs dropped into position with no issues, just a minor adjustment after the legs unfold.
Up there with Bowens Gemini monolight (extended to full height)
On to the other features and specs, Savage sent us the 13' stands which are great for studio or you need to get that light way up there, the stand actually expanded a bit higher than 13' but I really don't think I would like to have anything that high unless I really had to, though it was pretty stable that high I would probably station an assistant near it or load some sand bags at the feet for safety. 
How's the weather up there?


 Back at ground level the stand has one of our favorite features the 1/4 20-3/8 reversible spigot stud that can be mounted vertically or horizontally, this comes in handy with a few continuous lights and speed lights that we use in and out of the studio. 

Other Specs:
 These are air-cushioned...so no gear comes crashing down when tension knob is loosened.
All Aluminum construction (4 section) with aluminum collars.
Supports up to 15lbs.
Max height 13' (400cm) (though ours extended close to 14' I refrain from extending to limit on all stands, but that's me being Mr. Safety).
Minimum height 47" (120cm).
Folded 45"

Sizes to be released in stores;
7'
9'
13' (the ones we had the pleasure of using)


 Another nice little feature is the blue leg connector joint...this makes it easy for me to spot my Drop stands across the studio among my other studio stands.
We'll probably post updates along the way but so far these stands are making life around the studio less hectic when we're on the move.
For more info on these stands head over to the Savage site Savage Universal Drop Stand

Wednesday, January 20, 2016

Me and My Mantis

"From whence arrived the praying mantis?
From outer space, or lost Atlantis?
glimpse the grin, green metal mug
at masks the pseudo-saintly bug,
Orthopterous, also carnivorous,
And faintly whisper, Lord deliver us."
~Ogden Nash.


Even after I moved her to the top of the crates she waited around for me to set the shot up, when I started making some photos she figured is was a good time to groom herself...not sure if she was cleaning her mandibles or her toes. Maybe she had a big meal and was picking out some of the lovely bug bits from her mouth, mantises are a voracious and beneficial predator in the insect world.
We get quite a bit of them here at the studio, I watched a female eat a large group of hornets right out of a nest in a short amount of time...snagged them right out one by one and devoured every last one of them Mmm Mmm Mmm Crunchy! They also happen to be nature's little fashion models...they love to pose and check out cameras, this pertains to the adult females... adult males are a bit skittish and the young usually don't like to stick around for anything (in this area anyway).
Back to the gear and set-up.
For the most part I usually shoot most all my macro starting at aperture f/16 but because the mantis is quite lengthy I set to f/18 or f/22. You really need to play with your angles and perspective when capturing them.
For the most part they move pretty slow so 1/100 to 1/125sec shutter speed works well. ISO I had at 100. It was hand held for this as I was changing positions with her movements and the space was limited.

Nothing shows a mantis personality more than their big beautiful eyes so getting a nice catch light in the peepers is crucial for us with the Praying mantis or any insect really. Had the Nikon SB910 speedlight attached on camera with a Rogue FlashBender

You have a little something stuck to your mouth... no here, do you want me to get it?  Napkin Please! 1/100sec, f/22, ISO100, 180mm (Click photo to enlarge)


 Ready for the cuteness overload?


Kissy face!!! 1/100sec, f/18, ISO100, 180mm (Click photo to enlarge)
Same image as above, rotated and cropped to show detail. (Click photo to enlarge)


Friday, July 31, 2015

New at the Studio: Savage Universal Macro Art Adjustable Dual Arm LED Light

Well we wanted to call this (and some upcoming) blog post(s) "Equipment Review" or "Field Test" but we are sponsored by Savage Universal so it really would not be right to give a product review, Savage sends us some awesome gear and we wanted to share with you some of the cool things we get to use in and around the studio...so instead of "gear test" or "product review" we're just going to share some photos, our experiences and maybe some cool tips or tricks that might help you if are looking into the products.
       You might know Savage for their seamless paper backgrounds, backdrops, support stands and other studio equipment but recently they started promoting their Macro Art line up including extension tubes and the Dual Arm LED light we are featuring in our write up today.
Not going to lie...being sponsored is pretty cool and it's something we never thought would happen (more on that later in an upcoming post) so when packages show up it's like Christmas morning, we grab the boxes, run into the studio and immediately open the boxes to gaze on the gear with wide open eyes. After that we start thinking of all the different shoots and cool projects we will do with the gear. Most of the time we head right out and start shooting but it was later in the day so I decided to venture out first thing in the morning.
 It was no different when the LED light arrived but when you open the box you have gear that looks like it's gazing back at you, anything with a science fiction looking appearance is good in our book especially when it almost looks like one our favorite subjects to shoot in our spare time...insects.  I exaggerate a bit but the dual arms do resemble some bug antennae, these antennae...excuse me I mean arms are flexible articulated covered extensions which can be positioned in many ways for pinpointing lighting on your macro subject.  You can attach the light right to the hot shoe of your camera or secure it to a light stand or tripod via a cold shoe such as the enlight photo frio.
The easy to read control panel on the back has options for Flash or Continuous and each arm light can be operated separately, the lights at the end of the arms are surrounded by a cooling fin like casing.

The bug view

The other gear for the session.
 Camera Nikon D4
 3 Legged Thing Frank tripod.
 The LED light arms measure about 23" so that was plenty of length to reach around the Sigma 180mm lens (w/hood).
We were able to go above, under and around the lens for multiple lighting angles and more importantly stayed in place. If shooting insects you might want to position the lights in the desired orientation first as with most articulated arms they make a squeaky sound when you bend them...which could startle your multi legged subject. Also because the arms are pretty long you might want to remove the light if you are picking up your gear to relocate, the arms could bounce up and down when walking and you don't want to have the light hit the front of your lens...those light casings are metal.
Here are some shots we took with the dual Arm LED light starting with the image of a wild carrot called Queen Anne's Lace (Daucus carota).
1/125sec, f/11, ISO1600
 Here are some thistle. Love the way we were able to aim these lights.
1/200sec, f/16, ISO140

1/200sec, f/16, ISO140
The great thing about thistle is they attract butterflies, butterflies can be pretty skittish at least around here in the rural parts of New Jersey so it's best to focus on the flower and wait until they land while remaining quiet and still. We were lucky enough to have these Eastern Tiger Swallow Tails fluttering around the thistle all morning. We had one arm pointed underneath to get some light under the thistle as well as under the wings and the other arm coming down at a 45 degree angle to get some catch lights in the eyes.
Hi There!
awww, shy butterfly. ButterShy?


1/125sec, f/16, ISO400


Sharing the thistle with a bumble bee

Slurp!
Some insects I will actually approach without my gear and gently move in closer to see if they will "bug out", if they take off I pretty much know they won't stick around for me to set up my camera. Butterflies will usually return multiple times to the same flower so as mentioned before you just want to get set up, focus and wait. Don't try chasing butterflies from flower to flower it's near impossible to capture anything that way. I've actually watched photographers chase bugs when they switch flowers or fly away and the only thing you might get doing that is exercise, not that there is anything wrong with that but I enjoy relaxing behind the camera and sometimes with a tasty cool beverage while the bugs do all the work. We will have another post on photographing insects and even hummingbirds which explains in more detail on our set-up and method.
 That's pretty much it for our little write up, still testing the waters on blogging so I hope you at least enjoyed the photos. Again hoping it did not come across as a review, more shots soon when things settle down a bit here at the studio. More than likely we will bring it inside the studio to check it out during a product shoot or two.
For more on the Macro Art Dual Arm light or other Savage gear just head over to their site HERE.